STM32MP257F-DK: Unboxing
ST's STM32MP257F-DK development board - a hit or a hit ;)
The holidays are coming, so I got myself a present and I have to show it off 😃. Santa brought me the STM32MP257F-DK development board. It offers a 64-bit ARM, a coprocessor based on ARM Cortex-M33, and a dedicated AI accelerator. All in a single chip. In this article, we’ll look at the features and functionality of the STM32MP2 series, with particular focus on the STM32MP257F-DK development board. At the end, we’ll boot up the board and check how to connect to it.
What exactly is the STM32MP2 series?
The STM32MP2 series is a family of microprocessors (MPUs) from STMicroelectronics, designed for industrial applications. The wide operating temperature range from -40 to 125°C already hints at this. It’s the natural successor to the STM32MP1 series, but with several improvements. The biggest change? Transition to 64-bit architecture. The STM32MP1 series was based on the 32-bit Cortex-A7. STM32MP2 uses Cortex-A35. But that’s not all. ST also added a dedicated AI accelerator (NPU) with 1.35 TOPS of performance. In times when edge AI is becoming increasingly popular, that’s a pretty good move.
STM32MP257F-DK: Development Board
The STM32MP257F-DK is a development board (discovery kit) showcasing the capabilities of the STM32MP257F microprocessor. It’s a complete demonstration and development platform with plenty of peripherals - ready to go right out of the box.
Hardware Specification
Let’s take a look at what we have under the hood:
- Processors:
- Cortex-A35 (dual-core) @ 1.5 GHz - 64-bit
- Cortex-M33 @ 400 MHz - 32-bit
- NPU @ 1.35 TOPS
- GPU
- Trust Zone
- Memory:
- 4 GB LPDDR4 RAM
- 8 GB eMMC (built-in storage)
- microSD card slot
- Connectivity:
- 2x Gigabit Ethernet
- Ethernet Switch
- USB 3.0 Type-C
- 2x USB 2.0 Type-A
- Wi-Fi 802.11b/g/n
- Bluetooth Low Energy v4.1
- Display and Multimedia:
- HDMI output (up to 1080p)
- LVDS connector for LCD displays
- MIPI CSI-2 camera connector
- H.264 hardware acceleration
- Debugging:
- Built-in ST-LINK/V3EC for debugging
What’s in the Box?
The STM32MP257F-DK board comes with a pre-loaded microSD card containing:
- OpenSTLinux - a Linux distribution based on Yocto
- Demo software - ready-to-try examples In other words - insert the card, connect power, and you’re good to go.
First Steps: Connect via…
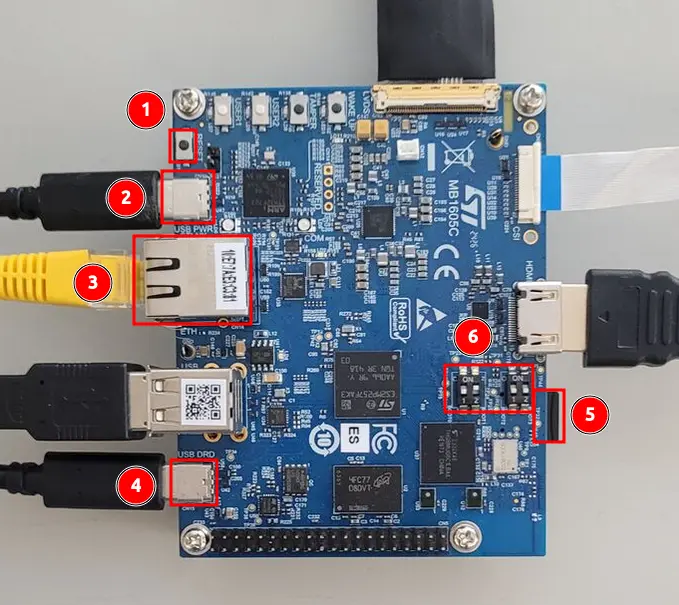
- Reset
- Power and console
- Ethernet
- USB-Ethernet
- SD Card
- Boot pins
Insert the SD card into the SD slot (5). Connect using a USB-C cable to the USB PWR port (2). 5V/3A power supply is also recommended. A quick measurement with a cheap USB meter shows current consumption around 300mA. So we can power the board from a regular USB-A port, at least if we’re not going to load it heavily. Set the boot pins to 1-0-0-0 (description).
… Serial Port
On Linux systems we should now see two TTY ports /dev/ttyACM<X> and /dev/ttyACM<X+1>.
If you’re on Ubuntu, you can install picocom, a simple terminal for serial port communication.
sudo apt install picocom
# If you want to use it without sudo
sudo usermod -aG dialout $USER
# You need to log out and log back in
To connect to the board, use the command:
picocom -b 115200 /dev/ttyACM<X>
# Exit picocom
Ctrl-A, Ctrl-X
… Ethernet over USB
The board has three network interfaces
# ip -br a
lo UNKNOWN 127.0.0.1/8 ::1/128
end0 DOWN
usb0 DOWN
wlan0 DOWN
Let’s check what’s happening on the board. The OpenST distribution uses systemd.
# systemctl status systemd-networkd -l
* systemd-networkd.service - Network Configuration
Loaded: loaded (/usr/lib/systemd/system/systemd-networkd.service; enabled; preset: enabled)
Active: active (running)
...
Feb 27 18:28:39 stm32mp2-e3-aa-db systemd-networkd[772]: end0: Configuring with /usr/lib/systemd/network/80-wired.network.
...
Feb 27 18:28:40 stm32mp2-e3-aa-db systemd-networkd[772]: usb0: Configuring with /usr/lib/systemd/network/53-usb-otg.network.
If we look at the network configuration files, we’ll see that USB-Ethernet has address 192.168.7.1/24 and the Ethernet port uses DHCP.
# cat /usr/lib/systemd/network/53-usb-otg.network
[Match]
Name=usb0
Type=gadget
[Network]
Address=192.168.7.1/24
DHCPServer=yes
KeepConfiguration=yes
[DHCPServer]
ServerAddress=192.168.7.1/24
# cat /usr/lib/systemd/network/80-wired.network
[Match]
Type=ether
Name=!veth*
KernelCommandLine=!nfsroot
KernelCommandLine=!ip
[Network]
DHCP=yes
Let’s try to establish a connection via USB-Ethernet first. So, plug the cable into the USB DRD port (4) and into your host. A new network interface will appear.
sudo ip -br a
...
enxb41adb4445a2 UP 192.168.7.105/24 fe80::d154:ea70:aace:4e0e/64
In dmesg we should see a similar message:
sudo dmesg
[ 9944.768820] usb 1-2: USB disconnect, device number 25
[ 9976.926393] usb 1-2: new high-speed USB device number 26 using xhci_hcd
[ 9977.051421] usb 1-2: New USB device found, idVendor=1d6b, idProduct=0104, bcdDevice= 1.00
[ 9977.051432] usb 1-2: New USB device strings: Mfr=1, Product=2, SerialNumber=3
[ 9977.051434] usb 1-2: Product: STM32MP1
[ 9977.051435] usb 1-2: Manufacturer: STMicroelectronics
...
[ 9977.080991] cdc_ncm 1-2:1.0 eth0: register 'cdc_ncm' at usb-0000:00:14.0-2, CDC NCM (NO ZLP),
[ 9977.112222] cdc_ncm 1-2:1.0 enxb41adb4445a2: renamed from eth0
And now we can access the board via SSH using the address from the configuration file.
ssh root@192.168.7.1
The authenticity of host '192.168.7.1 (192.168.7.1)' can't be established.
RSA key fingerprint is SHA256:UPMvOwkgQbPvhVs2ZQ/ttgXBpNV4C3H8GMDqCT6tTaQ.
This host key is known by the following other names/addresses:
~/.ssh/known_hosts:22: [hashed name]
Are you sure you want to continue connecting (yes/no/[fingerprint])? yes
Warning: Permanently added '192.168.7.1' (RSA) to the list of known hosts.
… Network
Connect via the Ethernet port (3) to your local network. The address is assigned to the interface via DHCP. There are several ways to find it out. If you have console access, you can read it using the ip command. Alternatively, you can check your DHCP server (usually your home router) to see which address was assigned.
If you don’t have such an option, you can use nmap to scan the network. If you’re not sure whether network scanning is allowed by your operator or might disrupt other devices, better skip it 😃.
sudo nmap -sn 192.168.0.0/24
Starting Nmap 7.94SVN ( https://nmap.org ) at 2025-12-15 20:56 CET
...
Nmap scan report for 192.168.0.186
Host is up (0.00037s latency).
MAC Address: 10:*:*:*:*:* (STMicrolectronics International NV)
Nmap scan report for 192.168.0.192
...
Nmap done: 256 IP addresses (5 hosts up) scanned in 2.57 seconds
Or let’s look at the ARP table.
ip neigh
192.168.0.186 dev wlp3s0 lladdr 10:*:*:*:*:* STALE
And if that’s still not enough 😃, we can sniff traffic with tcpdump and analyze ARPs.
sudo tcpdump -n -e arp
tcpdump: verbose output suppressed, use -v[v]... for full protocol decode
listening on enp0s25, link-type EN10MB (Ethernet), snapshot length 262144 bytes
20:59:05.131862 *:*:*:*:*:* > *:*:*:*:*:*, ethertype ARP (0x0806), length 42: Request who-has 192.168.0.1 tell 192.168.0.4, length 28
Sometimes you need to force network traffic when you have a silent device - a broadcast ping -c 1 -b 192.168.0.255 can help here.
Once you have the device’s address, you can connect via ssh as shown above.
Can’t Connect :(
It’s worth paying attention to the LED lights - they contain information about the boot state.
- Blue blinks when Linux is active on the Cortex-A core
- Orange blinks when the microcontroller is running (if it has sample software loaded) If you can’t connect, it’s worth resetting the device using button (1). The bootloader might have gotten stuck waiting for system selection:
Terminal ready
1: OpenSTLinux
Enter choice:
Summary
We’ve learned about the STM32MP2 platform and its key features. Then we booted up the device and tested various ways to connect to it. In future posts, we can look more closely at development, AI examples, or communication between A35 and M33. Thanks for reading!
Resources

Related Posts
Buildroot and STM32MP257F-DK
How to build and flash an image onto the STM32MP257F-DK board using Buildroot, plus an analysis of the generated image structure
Comments