Hello World with EDK II - First Steps with UEFI
Learn to build UEFI applications with EDK II. A practical Hello World tutorial with QEMU.
UEFI (Unified Extensible Firmware Interface) has replaced the old BIOS and become the firmware standard in today’s computers.
But how do you create your own UEFI application? 😃
Let’s get started!
What is EDK II?
EDK II (EFI Development Kit II) is the official reference implementation of UEFI from the TianoCore project. It’s an open-source project with Intel, HP, and Microsoft playing major roles. EDK II provides a complete environment for developing UEFI firmware - from simple applications to complex bootloaders and drivers.
EDK II has become the de facto standard for UEFI firmware development - if you want to create firmware-level software, this is where you should start.
EDK II Components:
- BaseTools - build tools (compiler, linker)
- MdeModulePkg - basic modules and examples (including HelloWorld)
- OvmfPkg - Open Virtual Machine Firmware for QEMU
- UEFI Shell - shell for testing applications
My Environment
I’m building on an x86_64 system and using Fedora 43.
Downloading EDK II and Setting Up the Environment
We have several options for using EDK II. Here we’ll use a container prepared by TianoCore.
docker pull ghcr.io/tianocore/containers/ubuntu-22-dev:34f8c50

docker run -it \
       -v "${HOME}":"${HOME}" -e EDK2_DOCKER_USER_HOME="${HOME}" \
       ghcr.io/tianocore/containers/ubuntu-22-dev:34f8c50 /bin/bash
In the container, we’ll download the project and set up our working environment. You must source . ./edksetup.sh in every new terminal! The script sets environment variables and adds tools to PATH.
cd ${HOME}/path/to/project

git clone https://github.com/tianocore/edk2

cd edk2
git checkout edk2-stable202511
git submodule update --init

make -C BaseTools
. ./edksetup.sh
First, we’ll build OVMF. We’ll need it to run our UEFI application in QEMU.
OVMF (Open Virtual Machine Firmware) is a UEFI implementation specifically for QEMU. It allows testing UEFI applications and firmware without the need for real hardware.
Alternatively, we can download ovmf via the package manager on the host. Virtually all Linux distributions provide this package (ovmf or edk2-ovmf).
We can build using the build command or stuart_*. stuart is a higher-level command and recommended for building platforms and running tests. It’s worth mentioning that code for other platforms is stored separately (edk2-platforms). Only virtual platforms are in the edk2 repository.
$ stuart_setup -c OvmfPkg/PlatformCI/PlatformBuild.py TOOL_CHAIN_TAG=GCC5
SECTION - Init Self Describing Environment
SECTION - Loading Plugins
SECTION - Start Invocable Tool
PROGRESS - ## Resolving Git Submodule: CryptoPkg/Library/OpensslLib/openssl
PROGRESS - ## Done.
...
SECTION - Summary
PROGRESS - Success

$ stuart_update -c OvmfPkg/PlatformCI/PlatformBuild.py TOOL_CHAIN_TAG=GCC5
SECTION - Init Self Describing Environment
SECTION - Loading Plugins
SECTION - Start Invocable Tool
SECTION - Initial update of environment
Updating.. Done
SECTION -       Updated/Verified 2 dependencies
SECTION - Second pass update of environment
Updating. Done
SECTION -       Updated/Verified 2 dependencies
SECTION - Summary
PROGRESS - Success

$ stuart_build -c OvmfPkg/PlatformCI/PlatformBuild.py TOOL_CHAIN_TAG=GCC5
...
INFO - ------------------------------------------------
INFO - --------------Cmd Output Finished---------------
INFO - --------- Running Time (mm:ss): 04:13 ----------
INFO - ----------- Return Code: 0x00000000 ------------
INFO - ------------------------------------------------
PROGRESS - Running Post Build
INFO - Writing BuildToolsReports to /home/fabbio/devel/uefi/hello_world/edk2/Build/OvmfX64/DEBUG_GCC5/BUILD_TOOLS_REPORT
DEBUG - Plugin Success: Build Tools Report Generator
DEBUG - Plugin Success: Debug Macro Check Plugin
DEBUG - Plugin Success: Linux GCC Tool Chain Support
PROGRESS - End time: 2026-01-17 18:38:22.612291  Total time Elapsed: 0:04:13
SECTION - Log file is located at: /home/fabbio/devel/uefi/hello_world/edk2/Build/BUILDLOG_OvmfPkg.txt
SECTION - Summary
PROGRESS - Success
The file will be available at Build/OvmfX64/DEBUG_GCC5/FV/OVMF.fd.
Next, we’ll prepare the UEFI application.
To do this, we’ll edit the file MdeModulePkg/Application/HelloWorld/HelloWorld.c and make three changes.
diff --git a/MdeModulePkg/Application/HelloWorld/HelloWorld.c b/MdeModulePkg/Application/HelloWorld/HelloWorld.c
index ab581c040c..fdb5121f00 100644
--- a/MdeModulePkg/Application/HelloWorld/HelloWorld.c
+++ b/MdeModulePkg/Application/HelloWorld/HelloWorld.c
@@ -10,6 +10,7 @@
#include <Uefi.h>
#include <Library/PcdLib.h>
#include <Library/UefiLib.h>
+#include <Library/UefiBootServicesTableLib.h>
#include <Library/UefiApplicationEntryPoint.h>
//
@@ -43,7 +44,7 @@ UefiMain (
UINT32 Index;
Index = 0;
-
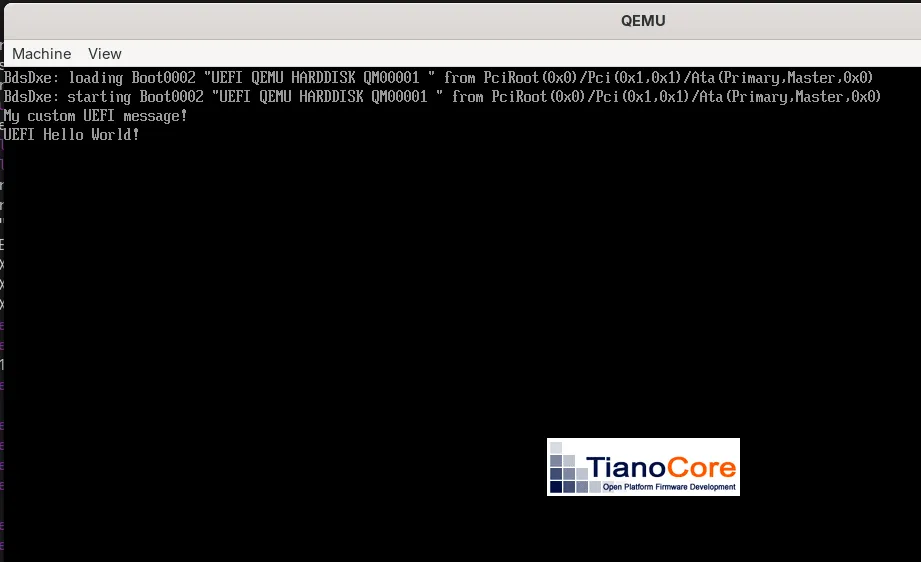
+ Print(L"My custom UEFI message!\n");
//
// Three PCD type (FeatureFlag, UINT32 and String) are used as the sample.
//
@@ -55,6 +56,7 @@ UefiMain (
Print ((CHAR16 *)PcdGetPtr (PcdHelloWorldPrintString));
}
}
+ gBS->Stall(5000000); // 5s
return EFI_SUCCESS;
}Explanation:
- UefiMain: this is the entry point of a UEFI application (equivalent to
main()in standard C) - Print(): function for displaying text (the
L""prefix indicates a wide string) - EFI_SUCCESS: return code indicating success in UEFI
- ImageHandle and SystemTable: parameters passed by UEFI to each application
To compile a single package from the MdeModulePkg module, we cannot use the stuart command. Here we’ll use build.
$ build -a X64 -t GCC5 \
  -p MdeModulePkg/MdeModulePkg.dsc \
  -m MdeModulePkg/Application/HelloWorld/HelloWorld.inf
...
- Done -
Build end time: 18:39:38, Jan.17 2026
Build total time: 00:00:11
The efi file will be at Build/MdeModule/DEBUG_GCC5/X64/HelloWorld.efi.
Now we’ll switch to the host and prepare the file system. UEFI looks for the default bootloader at the path EFI/BOOT/BOOTX64.EFI (for x64 architecture). We’ll copy our application under this name so UEFI automatically launches it at startup.
To avoid creating and formatting a FAT32 partition, we’ll use QEMU’s functionality to emulate a partition.
cd ${HOME}/<path/to/project>/edk2
mkdir -p /tmp/efi-boot/EFI/BOOT

# Copy your EFI app as the default boot application
cp Build/MdeModule/DEBUG_GCC5/X64/HelloWorld.efi \
   /tmp/efi-boot/EFI/BOOT/BOOTX64.EFI
If we don’t have QEMU installed, we can download the qemu-system-x86 package or similar. We’ll provide the path to the OVMF.fd file, either self-built or installed 😃, and to the file system. The OVMF.fd file from the package manager can be found at /usr/share/edk2/ovmf/ or /usr/share/OVMF/.
qemu-system-x86_64 \
  -bios Build/OvmfX64/DEBUG_GCC5/FV/OVMF.fd \
  -drive file=fat:rw:/tmp/efi-boot,format=raw \
  -net none
If everything succeeded, we’ll see our message, similar to the screenshot.
Alternatively: Manual Launch via UEFI Shell
You can also launch the UEFI Shell (select EFI Internal Shell) and load the application manually:
# In QEMU, in UEFI Shell:
Shell> fs0:
 FS0:\> ls
...
 FS0:\> EFI\BOOT\BOOTX64.EFI
My custom UEFI message!
...
Summary
In this article, we built our first UEFI application with EDK II! 😎
Key points:
- EDK II is the official development kit for UEFI from TianoCore
- OVMF allows testing UEFI applications in QEMU without real hardware
- The Hello World application shows the basic structure of a UEFI program
- UEFI looks for the default bootloader at the path EFI/BOOT/BOOTX64.EFI
Now you know the basics of UEFI firmware development.
I hope you enjoyed it. Thanks for reading!

Comments